Tutorial Clutch

Description
Are you looking for a practical yet stylish companion for a special evening? Then this clutch is perfect for you! With our simple sewing tutorial, you can let your creativity run wild and make something that complements your outfit perfectly. Customise your clutch with modern design touches and embellishments to make sure you stand out at special events.
You'll Need:


Gluing the paper pattern together
First, print out two copies of the sewing pattern on A4 paper. Tape or glue together at the markings: Make sure the arrows meet.

Sewing the folded version
If you decide to sew the folded version, either with a round, asymmetrical, rectangular or angular flap, cut out one piece along the solid line, and another piece along the dotted line. That means you now have a pattern piece for the outer- and lining fabric and lining fabric, and a pattern piece for your interfacing. In this tutorial, we are sewing the asymmetrical folding clutch.

Cutting the fabric
Lay your outer fabric onto your lining fabric. Make sure that the right sides of the fabric are facing each other. Place the larger pattern piece on top and fix with pins or weights. Cut both fabrics along the edge of the paper pattern piece. You now have two pieces of fabric (your outer- and lining fabric). If you have experience in using sewing patterns, you can go ahead and transfer the pattern markings for the bag closure and fold line at this point.

Cutting the Decovil und fusible interfacing
Cut the Decovil and fusible interfacing using the smaller pattern piece. This gives you the right size for the interfacing that will reinforce your fabric.

Adding fusible interfacing to the main fabric
To fuse the Decovil Light onto the outer fabric, simply place the adhesive side of the Decovil onto the wrong side of the fabric. Use your iron to fuse the Decovil to your fabric in accordance with the manufacturer’s instructions, and leave it to cool.

Adding fusible interfacing to the lining fabric
For the lining Fabric we are using a different fusible interfacing for the lining fabric: H 250. Simply follow the manufacturer’s instructions.

Transferring the pattern markings
If you haven’t done so already, transfer the pattern markings onto your fabrics by laying the outer fabric and lining together and transfering the edge markings onto your fabric as notches (small cuts along the edge of your fabric). Now transfer the marking for the closure onto the flap using tailor’s chalk or a chalk pen. Now transfer the marking for the closure onto the flap using tailor’s chalk or a chalk pen.

Embellishing the outer fabric
You can now let your creativity run freely, and embellish your outer fabric with applications, iron-on patches, trims, embroidery or fabric paint. You can also quilt your outer fabric, adding a layer of style wadding or padding for a 3D effect. Make sure you don’t lose the marking for your closure!

Sewing together the main body and lining fabrics
Lay both of the interfaced pieces (outer and lining fabric) together.

Leave an opening
Make sure you leave an opening on the shorter edge. Only stitch around 4cm from the edge towards the middle, where you should backstitch to secure the seam, then continue sewing the remaining 4cm of the edge. Don’t forget to backstitch!

Attaching the closure
Finally, add the clasp. We made three different varieties in this tutorial. The clasp you choose can affect the order in which you should finish your clutch.

Magnet closures #1
A magnetic clasp is made up of four parts, which can be hand-sewn to your bag. The male part of the clasp is attached to the flap, while the female part is attached to the main body of the bag. To get a better idea, take a look at a regular bag with a magnetic clasp. For our clutch, we can attach both parts of the clasp in this step.

Magnetic Closure #2
The marking that you transferred to the flap shows where you should attach your clasp. When you fold the bag along the fold line, you will see where the female part of the clutch needs to be attached to the clutch. The best way to do this is to stick two pins through the fabric to “trace” the marking. Attach both parts of the clasp. Tip: If you’re using a lightweight fabric, you can reinforce the back of the clasp on the flap using an offcut of interfacing.

Magnetic Closure #3
Make a small cut with your scissors or a seam ripper so the brackets of the clasp can be poked through. Insert the clasp, position the back underneath and press the legs inwards. You can now continue to the ‘Folding’ step. (26.)

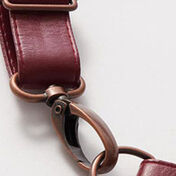
Key Clasp #1
You can use this type of closure for any folding clutches with a straight edge. First, attach the bottom part of the key clasp, as this has to be invisibly secured later on. The centre of piece, that needs being cut is marked on the pattern, and you can use this as a guide. To check the position, fold the bag and position the key clasp.

Key Clasp #2
Once you have a position you’re happy with, cut two holes/snips in the clutch and put the clasp through.

Key Clasp #3
Next you position the washer piece from the back, and snap both brackets inwards.

Key Clasp #4
You can now continue to the ‘Folding’ (26.) step. Once you’ve closed the opening, you can attach the second part of the closure onto the flap. Simply make another two small cuts, insert the brackets and push inwards.

Turn Clasp #1
The turn clasp can be attached to all variations of this clutch. First, attach the bottom part of the turn clasp, as this has to be invisibly secured later on.

Turn Clasp #2
Mark the position of the turn clasp, cut little slits where the markings are, insert the turn clasp, position the disc and fold down the brackets.

Turn Clasp #3
This is how the movable part of the turn clasp looks from the outside. Finally, fold the clutch, stitch and turn - and your bag is ready.

Turn Clasp #4
You can find the right position for the second part of the turn clasp by closing the almost completed bag and using the upper flap to mark the point where the clasp creates a bump.

Turn Clasp #5
Now cut a hole into the flap. It’s better to use small embroidery scissors here, rather than the shears we used.

Turn Clasp #6
Stick both closure elements through and secure. The clips should not be visible from the outside

Turn Clasp #7
This is what both sides should look like.

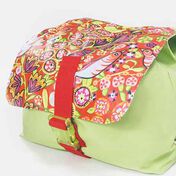
Folding the Bag
Now, arrange your pieces with the rights sides facing up. Fold the edge where the outer fabric and lining meet upwards to meet the top marking.

Attaching the pocket flap
Place the flap down and be very precise. Pin everything or fix with clips.

Sewing the Bag
Using a 1cm seam allowance, stitch the side seam and flap. Remember to backstitch at the beginning and end of your seam. Make sure you don’t stitch over the Decovil, sewing carefully along the seam allowance. Notch or grade your seam allowance around the corners and curves. It will help the seam to lay more evenly after the next step.

Turning the Bag
Turn the bag through the opening. Use a blunt implement to make sure all corners and curves are properly turned.
")
Closing the opening (variation 1)
There are a few different ways you can close the opening. You can topstitch the top edge with matching thread.
")
Closing the Opening (variation 2)
Or you can do it by hand, using a blindstitch Tip: use a thimble.
")
Closing the opening (variation 3)
You can also use Vlisofix to close the opening by simply glueing the two fabrics together. Just cut a strip of Vlisofix 10cm long by 4cm wide ...
")
Closing the opening (variation 3)
... and iron on between the outer and lining fabrics in accordance with the manufacturer’s instructions.
")
Closing the opening (variation 3)
Then remove the backing paper.
")
Closing the opening (variation 3)
Iron again to close the opening. Make sure that your fabrics are nice and smooth.

Finished!
You could also topstitch close to the edge along the flap e.g. with a contrasting thread. Just press and you’re ready to go.